Raspberry Pi Homeserver - Part 1
I finally folded and bought myself a Raspberry Pi 3. I have been thinking about using one as a media server on my home network for quite some time now. Holidays arrive, I needed something to play around with, and just could not withstand the temptation any longer.
Did I really need one? Depends on what you mean by “really need”. I have a pretty old NAS (a Seagate Black Armor 110) and accessing my media on my mobile devices was kind of cumbersome. Add that to the fact that playback over my stereo always required a proper computer to be up and running, and I think buying one was justified.
But never mind that, now that I finally have a Razzy there is so much stuff to try out! I love me my tools, and now that I have a server installing some self-hosted stuff won’t hurt.
![]()
Some of my ideas:
- Run a local-network-only DNS server. Use sub domains to access all devices in the household!
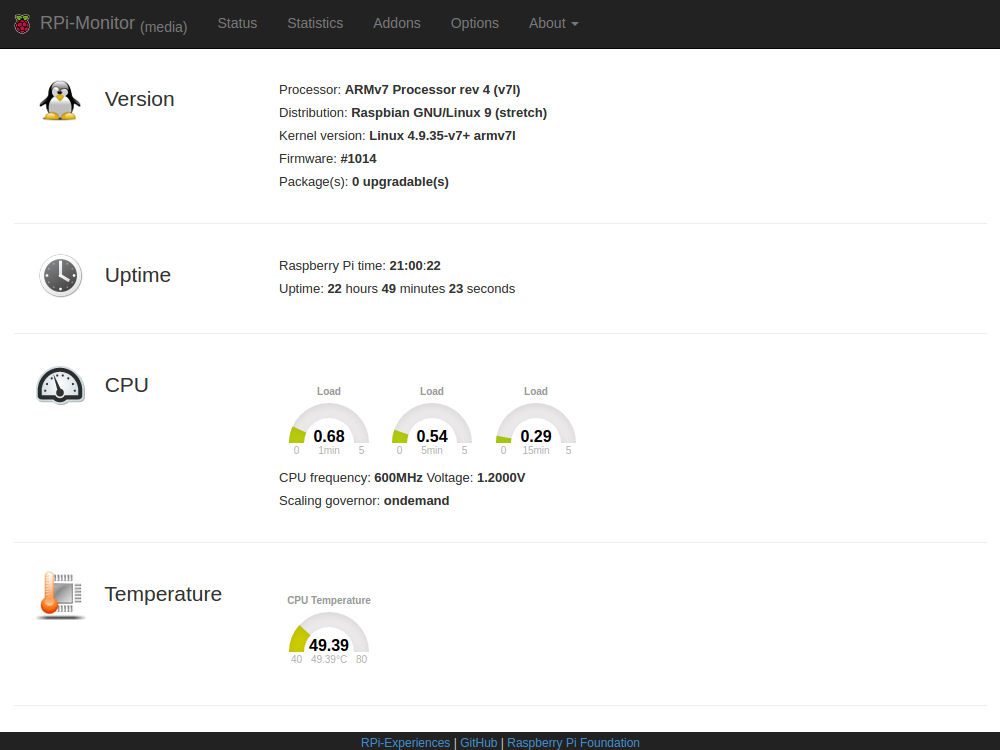
- Monitor the Raspberry using a Web Interface.
- Use the Raspberry as a Jukebox. Remote control with an Android App and a Web Interface should be possible.
- Use the Raspberry as a media center - for playing music. Don’t really care about movies. Streaming to Android is nice, but no must.
- Run a document search engine on the Raspberry. This Github repo inspired me!
- Use the Raspberry as an alarm clock - for waking me up in the morning! Overkill? Probably.
- Make everything accessible from the outside using DynDns. After properly securing the server, of course.
- …
In this post, I’ll write about setting up the DNS Server and installing RPI-Monitor.
A Fresh Start
I bought the Vilros Raspberry Pi Starter Kit off Amazon, because I couldn’t find a naked Razzy that would ship to Austria and because I’m lazy.
Getting the Raspberry to run went without a hitch. Assembled everything, booted from the SD Card (which comes with Noobs already on it) and done. Connect to the network, give the device a static IP Address using the home router, and we are good to go.
At this point I only connected to the Raspberry using SSH. Because password authentication over SSH is cumbersome I enabled connection using my private key. It’s a one liner.
cat ~/.ssh/id_rsa.pub | ssh [email protected] 'cat >> .ssh/authorized_keys'Obviously, change the key name and IP of the raspberry to fit your needs. Now, instead of typing that IP address every time, wouldn’t it be nice if I could just SSH to [email protected]? Yeah, I thought so too. For the purposes of SSH an alias would have been sufficient, but where’s the fun in that?
Installing Dnsmasq
Some quick research showed that my best bet would be to run dnsmasq. Now to be frank, there are a ton of tutorials showing how to configure dnsmasq to do all kinds of crazy stuff. For me, most of that stuff was overkill and did nothing except confuse me.
I ended up going with this official tutorial. Its very easy to follow, you ned to do is all DHCP related stuff. Everything boils down to a couple of commands.
sudo apt-get install dnsmasq
sudo nano /etc/dnsmasq.conf
After that add the mappings of domains to IP addresses. I ended up having leading dots, because of this Stack Overflow thread, but I’m not sure if it actually makes a difference.
no-hosts
address=/.media.home/192.168.0.3
address=/.nas.home/192.168.0.2
address=/.router.home/192.168.0.1
Having the mappings in its own file did not work out for me for some reason. It might for you. Anyway, restart the dnsmasq service and you are done.
sudo service dnsmasq restartYou should now be able to connect to your Raspberry using your selected domain.
Installing RPI Monitor
I didn’t spend much time looking for monitoring software. One of the first things I came across was RPI Monitor. Once you found the right bit of information - which was harder than it should be - installation is straight forward. Mostly you can just follow the instructions in this repository.
sudo apt-key adv --recv-keys --keyserver keyserver.ubuntu.com 2C0D3C0F
sudo wget http://goo.gl/vewCLL -O /etc/apt/sources.list.d/rpimonitor.list
sudo apt-get update
sudo apt-get install rpimonitor
If you did good you should be able to find the corresponding web page under something like media.home:8888. It will show you things like how hot your Razzy is getting, how much CPU it currently needs and so forth. It also provides you with some nice statistics.
Next time we’ll figure out how to get rid of that port and replace them with sub domains. We’ll also dive into the confusing world of home media center software.