Raspberry Pi Homeserver - Part 2
I purchased and configured a Raspberry Pi 3 a couple of months ago. Back then, I wrote about some basic set up and future plans. I haven’t had to opportunity, but today I want to write about some other stuff I did to that poor device.
One major problem that I faced was been finding software that allows me to both use the Raspberry Pi as a jukebox and as a media streaming server. Turns out that’s not as easy as I thought. Or maybe I’m just picky. I also played around with Reverse Proxies because accessing your services using something like subdomain.domain.home is so much cooler than using some IP. I also installed Pi-hole because I got annoyed with some ads when browsing on my Android devices.
Subsonic or Libresonic or Airsonic
I had some trouble finding a media server so suit my needs. Consider the following requirements:
- I want to stream music on devices in my home network. Those devices can be desktops or mobile devices. Thus the media server should provide a decent web interface and be supported by some decent apps.
- I want to play music directly on the Raspberry. The Raspberry Pi is wired directly to my stereo, so remote controlling it to play music is a must.
Turns out those requirements already make it quite hard to find a fitting media server. At first I tried Plex, but I found the Jukebox mode there (I think it’s called “fling media” or something) lacking. Simply couldn’t get it to work. Apart from that: I want to stream music and the features Plex provides just feel like overkill. Kodi was disqualified for the same reasons.
I also stumbled upon Mopidy, but although interesting I found that the web interfaces provided there didn’t really work all that well. Apart from that Mopidy works more as an aggregator for other music services and less as a media server. So.

Then I stumbled up Subsonic. I tried it out and generally was quite happy with it. The jukebox performed well although I initially had some trouble getting it to work properly. Unfortunately, Subsonic is closed source and will start displaying ads after a trial period. Unless you purchase a license. Boo. I then moved on to Libresonic, which is an open source fork of Subsonic, just to find out that the project is undergoing some management issues and isn’t that well maintained. Recently, Airsonic was created as a fork of Libresonic which is a fork of Subsonic and I decided to stick with it. Simply because it is free, open source and well maintained.
Installing and Setting up Airsonic
Following the instructions here Airsonic is easily installed.
Since I did not want Airsonic to start under the url http://localhost:8080/airsonic I simply renamed the airsonic.war file to ROOT.war. So far, this has caused no issues.
In order to give Airsonic access to media (which lies on the NAS) mount your music folder using /etc/fstab.
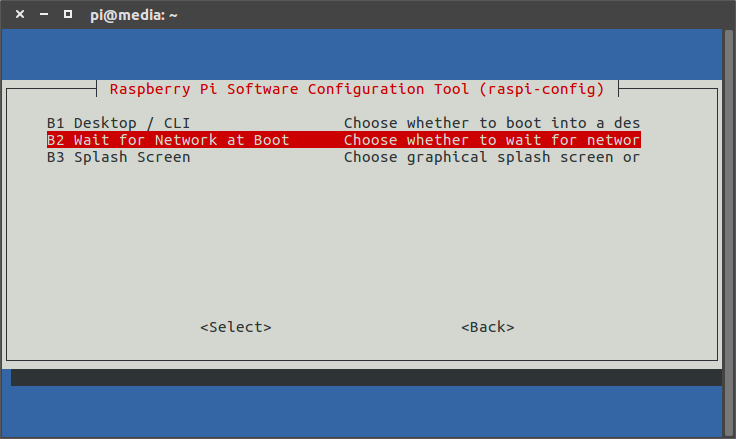
192.168.0.2:/volume1/Media/Music /media/music nfs noauto,x-systemd.automount 0 0I tried a couple of things to make this folder mount upon boot. Adding noauto,x-systemd.automount ultimately did it for me. To make sure that mounting only takes place after the network adapter is initialized run sudo raspi-config and enable Wait for Network at Boot.
In order to enable Jukebox mode head over to the Airsonic Settings and select Players. Copy the existing player and set it to Jukebox mode. When selecting tracks for playback make sure you chose the correct player at the bottom.
Ports and IPs
At this point, I could only access Airsonic and RPI-Monitor using their respective ports. For Airsonic that would be http://192.168.0.3:8080 or similar.
I wanted more, I wanted sub domains. I order to access the services running on the Raspberry Pi using sub domains I used Apache 2 Reverse Proxy.
I largely followed this tutorial. To set up a reverse proxy for a single service, e.g. Airsonic just create a new config file in /etc/apache2/sites-available/. The contents of my airsonic.conf are
<VirtualHost *:80>
	ServerName airsonic.media.home
	ServerAlias airsonic.media.home
	ServerSignature Off
	<Proxy http://127.0.0.1:8080>
	 Allow from all
	</Proxy>
	ProxyPreserveHost on
	ProxyPass / http://127.0.0.1:8080/
	ProxyPassReverse / http://127.0.0.1:8080/
</VirtualHost>
I did the same thing for RPI Monitor while at it. Only I chose a different domain. To set the default domain to forward to RPI Monitor create a config file with contents like so.
<VirtualHost *:80>
	ServerName media.home
	ServerAlias media.home
	ServerSignature Off
	<Proxy http://127.0.0.1:8888>
		Allow from all
	</Proxy>
	ProxyPreserveHost on
	ProxyPass / http://127.0.0.1:8888/
	ProxyPassReverse / http://127.0.0.1:8888/
</VirtualHost>
Enable those by running sudo a2ensite your-conf.conf and then sudo service apache2 reload.
Using PiHole
There isn’t much to say about installing Pi-hole. Simply follow the installation instructions on their website.
One problem I observed was the fact that port 80 was already taken when using the default install, so I had to make Pi-hole use a different port. To do that, simply run these instructions:
sudo sed -ie ‘s/= 80/= 8093/g’ /etc/lighttpd/lighttpd.conf
sudo /etc/init.d/lighttpd restart
Of course I also provided a sub domain for Pi-hole so I could access the web interface using http://pihole.media.home/admin.